This is a chronicle of Our Green Adventure, the quest of one family to live a healthier, greener lifestyle. Join us as we make conscious decisions about where our food comes from and how we can make a difference, no matter how small.
Sunday, November 1, 2009
Hurray for leaves!
These are all from just 1 one of the loads she brought.
Here is the crew moving all of the leaves to the garden. Our oldest kiddo had just tripped, but had a soft landing.Our dog, Pepper, supervised the whole operation.
Sunday, May 17, 2009
Growing Hazelnuts
About three years ago I saw an ad from the Arbor Day Foundation that had hazelnut bushes for sale. As one often prone to making impetuous decisions, I fervently insisted that we get some! I logged countless hours of research on the internet, devouring anything I could find on the topic of growing hazelnuts. I encountered information ranging from growing hazels from seeds and clippings to emerging markets in hazelnut production.
My dreams of someday selling candied hazelnuts at the farmer's market were dashed, however, when all three of my plants died. The next year I received a survey from the Arbor Day Foundation asking me how my plants were fairing. I indicated that they were dead and they offered to send replacement plants during the next planting season. Of those three replacement plants, only one remains. I planted two in my yard and entrusted the third to my mother.
Without significant growth, I did not have high hopes for my two. Imagine my surprise when I parted the spring wall of grass to discover this one survivor, after losing all hope that I would one day have healthy hazelnut bushes in my backyard. When we visited my mom for Mother's Day, I slipped back to check on the one I had hoped would have better luck in her yard. I was saddened when I could not find it in the monstrous pack of weeds that had overtaken the area where we had planted it.
My hope now is that I can help this last little guy along until he is healthy and hardy enough to offer a clipping so I can plant another bush. I'll keep you posted!
Saturday, May 16, 2009
Planting a Garden
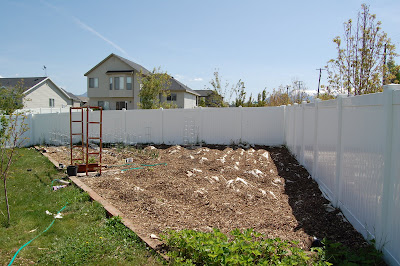
Each year we have strived to make better use of our bountiful garden area. Last year marked the best efforts, with about two thirds of the space planted and maintained throughout the growing season. We've learned some tough lessons along the way that have helped us better understand weed control and how to better control watering with a heavy, clay based, soil. What we were unable to plan in time, we covered with a tarp, black side up, in order to nuke any weed seeds that might be waiting underneath with the heat of the hot summer sun.
This year, however, we have finally hit the mark and all of our garden has been planted, or has seedlings waiting to be hardened before moving to their allocated positions. Not only that, but we have moved outside of our large garden area and have put a few raised beds together. These beds are the new homes of salad greens and radishes, potatoes, and raspberries. I've also got an order of sweet potato starts on the way!
I am in the process of standing up a bean trellis along a portion of our white vinyl fence to contrast with a plentiful wall of green foliage and succulent beans for use in stews, soups, salads, and all other sorts of delectable dishes. Garden fresh green bean casserole, anyone? We are growing five types of beans this year: the standard green bean, a purple bean (which will turn green when cooked), a yellow bean, an Italian flat bean, and the prize of the lot, Dragon Tongue (link to Burpee, the producer of our original seeds)- an heirloom bean we hope to propagate through the years to come.
The project has gone so well that we will likely duplicate the effort along another section of fence for a cucumber jungle gym of sorts. Anyone who has ever grown cucumbers before can attest to their natural ability to climb and elbow their way through a garden. Giving them their own space to climb seems like a sensible notion. Besides, we can always rotate them with the beans in the years to come.
With most of the mulch down and the the majority of our seeds in the ground, I can rest my hands on my hips, take a deep breath, and allow my chest to swell with a bit of pride. We've learned so much in these past years and we've worked so hard this season. Sure, it isn't over yet and there are still obstacles to overcome, but we can be proud of everything we've managed to accomplish as a family.
If you would like to read an article I recently published about starting a garden, click here. Also, we'd be honored if you would bookmark this blog and return to join us on our green adventure. I am currently putting together a video detailing some of our specific gardening efforts and a few of the lessons we have learned. There are several more posts a-brewin', including a glimpse into my recent homebrewing efforts - so stay tuned!
Bookmark Our Green Adventure - A Family Blog
Thursday, May 14, 2009
Easter Egg Dyeing, Green Style
I had said many weeks ago that I would talk about our Easter egg dyeing this year. It is obviously no longer even close to Easter, but hey, that makes it closer to next year, right? This year I decided that we would be dyeing our eggs with natural dyes from food. I mainly wanted to do it for fun, but also because I have been noticing more and more how much artificial dye is in everything. There have been some studies that have shown that some children are sensitive to red food dye, causing them to be overly active and out of control. The risk of that is pretty low, but why chance bad effects of artificial dyes when you can have a lot of fun with natural ones? My mom and younger sister even came over to dye eggs with us.
To be perfectly honest, this is a quite a bit more work than plopping those little color tablets into a small cup of water with some vinegar. It probably is a bit more expensive too, considering the price I saw on some Easter egg coloring kits this year. For me it was worth it though, and I do believe we will be repeating the venture next year, hopefully with improvement.
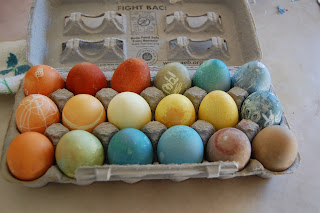
So, how do you go about making natural dyes for eggs. Here are all of the colors that we made, the ingredient used, and how I made the dye. I also wrote how each one worked out. Of note, I did add a couple tablespoons of white vinegar to each color.
Yellow - Turmeric. I boiled about a tablespoon in a quart or so of water for about 15 minutes. It worked very nice and made beautiful bright yellow eggs. This was the dye that worked the fastest.
Orange - Yellow Onion Skins. I filled a large pot with onion skins that I had been saving in a mesh bag for a couple of months. Then, I covered them with water and boiled until the water became a nice deep orange color. It made a lot more dye than I needed, but the eggs were really nice.
Blue - Red Cabbage. Again, this is a boiling one. The blue color of the water after boiling a while is absolutely beautiful and turns the eggs a lovely blue. The eggs do have to sit in the dye for a while, at least 30 minutes or so for it to color them. I am thinking next year I will boil the eggs to cook them in the dye to help them take the color faster.
Purple - Grape Juice. I used concentrated grape juice, diluted enough to fill a quart jar. This one did not really work out too well. The eggs were kind of sticky and if you tried to rinse the stickiness off, the dye would come off a bit. I found that if I let them dry completely and then rinsed them it worked better. It also looked like blue more than purple, so I do think I will be trying to figure out a better way to make purple though.
Pink - Beets. I used canned beets for this. I just drained out the liquid and used that to dye the eggs. It did not work well. It will probably work better if I get fresh beets and boil them. This method made beige, only slightly pink eggs which were not very exciting.
Green - Spinach, and then a combination of red cabbage and turmeric. I had read somewhere that spinach could be used to make green dye. Boiling spinach to make green dye did not work. It smelled bad and was a gross brownish-greenish color that was not really dark enough to dye anything. Luckily, taking an egg that had been dyed blue with the red cabbage and then putting it in the turmeric dye for a bit worked very nice so we were able to have some green eggs.
We had a lot of fun dyeing our eggs. The kids used a white crayon to draw their names and things on some of the eggs before dying them. Brady wrote "Dad Rocks" on one and whoever found it got a dollar. My younger sister wrote that she was the bomb on another. The only downside I saw to dyeing eggs this way was the initial prep time, which was not that bad, and that you need a little more patience to see the eggs colored since the dye takes longer.
Tuesday, May 12, 2009
Asparagus Leek Soup
1 large leek, sliced into 1/2 inch pieces
3 Tbsp. butter
4 medium potatoes, peeled and diced
3 medium carrots, thinly sliced
1 tsp. salt
2 1/2 quarts vegetable broth
1/2 cup uncooked long grain rice
1 pound fresh asparagus, cut into 1-inch pieces
1/4 tsp. pepper
1 cup heavy cream
In a saucepan, saute the leek and onion in b utter until tender. Add the potatoes, carrots, salt, broth, and rice. Cover and bring to a boil. Reduce heat and simmer for 25 minutes. Stir in the asparagus, cover, and simmer for an additional 10 minutes or until vegetables are tender. Add the pepper and cream; heat through.
I cannot say why this was not really our thing. We did like the Potato Corn Chowder we had a while back. Maybe we are cream souped out? I think a variation of this done with more of a tomato broth would be better for us. Perhaps in the future you will see it here.
Saturday, May 9, 2009
Live Green Eco-Festival
There were several vendors selling ready-to-plant vegetables. The widest variety came in the form of heirloom tomatoes. Since Tara and I are both very interested in propagating seeds from our garden to plant the next year's crops as much as possible, we were very interested in the unique heirloom varieties. Here are a few that we decided to bring home with us (click on the pictures for a larger view):
There were several other attractions to the Live Green Eco-Festival as well. We didn't have time to watch any of the movies or presentations, but we perused the booths and grabbed a bite to eat from the zero-waste food vendors.
Tara also found some very nice soap and couldn't help but bring a few bars home with us. (I guess there are worse things to be addicted to!)
One of the more prominent highlights of the festival, though, was the kombucha Tara found! This was quite a surprise as we've been wanting to start brewing our own kombucha tea but had no idea where to find a live culture.
(Special thanks goes out to Catalyst Magazine!)
Sunday, May 3, 2009
Playing for Change
On a lighter note, I am proud to present a video that I stumbled across on YouTube. It is an immaculate representation of human ingenuity that so many people could come together from so many parts of the world to create something as beautiful as this:
Thursday, April 30, 2009
Picking Asparagus
Tara mentioned in her Meatless Monday post that we had taken a trip to the U-pick-it Farm to cut fresh asparagus. This is actually a picture taken from our 1st year plantings in the garden the night after our little adventure, since I forgot to snag the camera before we headed out. But even without being able to take action pictures for the post, we all had a blast.
It might be hard to imagine describing such an outing as 'fun', and I will admit that it does sound a little weird saying it. While there are certain benefits apparent with picking your own asparagus, such as having access to fresh produce that hasn't been stored in a bin and poked and prodded by various shoppers and their children before you've purchased it, there are also those moments that can't be quite as easily described. Like watching your toddler step daintily between the rows in the field, stopping to point at a bunch of small green vegetables pointing their way up through the loose brown soil. Or seeing your son, who normally spends the majority of family outings with his head hidden behind his Nintendo DS screen, eagerly rushing from one grouping to the next in search of the perfect asparagus to cut.
Our oldest was stuck with me. We combed the rows in the field looking for pristine shoots that were around 6 inches in height, avoiding the ones that looked too fat or too skinny. It felt odd having so much control over the ones we picked, rather than rummaging through the pre-bundled bunches in the produce aisle. It was liberating and the fruits of our labor were delicious!
Monday, April 27, 2009
Roasted Veggies with Macaroni and Cheese
1 lb. radiator or elbow macaroni
¼ c. flour
16 oz. extra-sharp Cheddar cheese, shredded (about 4 cups)
3 ½ c. milk
½ tsp. minced garlic
1 tsp. prepared mustard
1 tsp. salt
Heat oven to 350º. Grease a shallow 3 quart baking dish (13 x 9). Cook pasta in a large pot of lightly salted boiling water as package directs until firm-tender. Drain in a colander; rinse with cold water and let drain again. Meanwhile, melt butter in a large saucepan. Add bread crumbs and cook over medium heat, stirring often, 3 minutes, or until golden and crisp. Scrap into a small bowl and stir in 2 Tbsp. each Cheddar and Parmesan cheese. Wipe saucepan clean and add milk, flour, and garlic; whisk until blended. Place over medium-high heat and bring to a boil, whisking often. Reduce heat and simmer 2 minutes. Remove from heat; stir in remaining cheeses, mustard, and salt. Add pasta to baking dish. Stir in sauce. Sprinkle evenly with crumb mixture. Bake 30 minutes, or until hot and bubbly around edges.
The asparagus was extra yummy being as fresh as it was. Hopefully we will be able to go pick some more soon.
Thursday, April 23, 2009
Mother Earth News
Since then, Tara and I stopped buying the odd magazine from the news stand and paid for a subscription. We look forward to each issue and have learned some valuable tips and tricks. Another amazing thing about this magazine is the vast online resources that are available for subscribers and non-subscribers alike on their website, www.MotherEarthNews.com. There are a few pop-up adds here and there asking you to subscribe, but it's not that bad for the gobs and gobs of otherwise free resources you can sift through.
Another neat thing was when I showed my mom one of our issues and she chimed in with, "Oh yes, I used to get this magazine when you were just little."
But there are some things that bother Tara and I when we read through the new issues. Sure, there are green articles, but seldom is it that you get good how-to advice. One recent dander-raiser was an article about a woman who went green by finding a co-worker who owned a farm and then spending a lot of time at her house. Sure, that's great if you just happen to have a co-worker who has worked to buy farmland and is nice enough to allow you to mooch off the fruits of their labor, but what about the rest of us? And then there are the articles about how some couple built their own home for under $30,000. Of course, the piece is mostly background information on the couple and doesn't include plans or how the building materials could be acquired by the average individual.
Maybe I should write a letter to the editor and request that we get more articles about the various new green home kits that are being produced. Or maybe a few about yurt living. The truth is, we don't subscribe to the magazine for feelgood articles, we thirst for knowledge.
We've loved the resources for propagating seeds from one season to start the next and it has helped to expand our sustainable living mindset. The article for cheese making got us both very excited, though we have yet to attempt to make our own cheese since things have been so busy, but I loved making mead from the instructions I found online. (I'll post about that soon!)
All in all, we enjoy receiving this magazine in the mail. We don't always agree with their opinions, but we do find information that has become very valuable to us and in the end that's what's important.
Monday, April 20, 2009
Spinach Artichoke French Bread Pizza
1 loaf of french bread, quartered
2 Tbsp. butter
2 Tbsp. extra virgin olive oil
1 onion, finely chopped
3 cloves garlic, minced
salt and pepper
3 Tbsp. flour
1 1/2 cups milk
1 pinch nutmeg
2 (10 oz.) boxes of frozen spinach, thawed and squeezed dry
2 cans artichoke hearts
1/2 cup grated Parmesan cheese
2 cups shredded mozzarella
2 Tbsp. finely chopped fresh thyme
Preheat the oven to 400 degrees. Arrange the bread on a baking sheet. In a medium skillet, melt the butter with the olive oil over medium heat. Add the onion and garlic and cook until softened, about 5 minutes. Season with salt and pepper. Whisk in the flour for 1 minute, then whisk in the milk and season with nutmeg. Cook until thickened, about 5 minutes. Pull the spinach apart, then add to the sauce. Fold in the artichokes and cook until heated through. Stir in the Parmesan cheese, season with salt and pepper, and remove from the heat. Spread the spinach and artichoke mixture on the bread and top with the mozzarella. Bake until the cheese is melted, about 10 to 12 minutes. Top with the thyme.
Tuesday, April 14, 2009
Turning Off the Television
We still watch movies and play console games and the children play free educational games on the internet and borrow software from the local library, so there is plenty of entertainment to be found in our household. What we've cut out, though, is a large portion of commercial advertising. This doesn't sound like much, but seeing things that you "must buy" every 10 to 15 minutes does it's part to turn us all into what I like to call Unconscious Consumers.
We all have to buy some things some time, it's true. Even the best of us living in suburbia can't produce everything we'll ever need. But by avoiding commercials and routine stops to the store without a specific grocery list in hand, we create a mindset of buying local, buying green, and buying fresh rather than a mindset of simple convenience.
Furthermore, with more and more commercials geared towards kids (either talking directly to children and inferring that they should take care of their parents, or by using child spokesmodels) what is the television teaching our children behind our backs, or in some cases, right under our noses?
As part of the Television Babysitter generation, I can personally attest to the struggles I had as I first entered 'real life' and how hard it was to curb the idea of casual spending. I think I did better than some, for sure, but it took a few years before we settled into a concrete spending system. Direct TV was costing us upwards of 60 dollars a month, but we found that as we grew more and more aware of our values, the less we ended up watching. We found ourselves spending more time outside in the backyard, working on the garden, and pursuing other forms of entertainment.
Another pleasant side effect of turning off the TV was that the rude and ignorant sayings our children were picking up from their programs stopped. That and I no longer had to filter out which of their kid's shows they could and could not watch as a result of those comments. Now we can enjoy an evening on the Wii Fit or playing Mario Cart instead. And if a commercial comes on while we're watching Heroes that has an obvious marketing ploy that catches the little ones in the snare, we explain it to them.
Monday, April 13, 2009
Lemon Veggie Stir-Fry
1 to 1 1/2 pounds fresh asparagus, ends trimmed, cut into 2 inch pieces
1 red bell pepper, cut into strips
2-3 carrots, skinned and cut into 1/2 inch rounds
1 yellow summer squash
3/4 pound bow tie pasta
Juice from 1 lemon
1/2 cup water
1 package of Garlic and Herb dressing mix
1 Tbsp. oil
1/2 c. Parmesan cheese
Start large pot of water for pasta. Add pasta when water reaches a boil and cook until done. While pasta is cooking, work on the vegetables. Heat oil in a large pan. Saute all vegetables until they are cooked as you desire. In a small bowl, mix water, dressing mix, and lemon juice and stir until combined. Add lemon juice mix to the vegetables. Drain pasta and add to the vegetables. Mix until everything is well combined. Serve with some Parmesan cheese sprinkled on top.
You could always add other vegetables to this depending on what you had on hand. The lemon and dressing sauce adds nice flavor to everything. I did not get any final pictures taken, but Brady thankfully took a nice picture of my work area. What a sweetie!
Tuesday, April 7, 2009
Black Bean Burgers
Black Bean Burgers
2 cans black beans, drained and rinsed
1 1/2 cups breadcrumbs
1 4 oz. can of green chilies, drained
1/4 cup minced green onion
1 tsp. chili powder
1 tsp. ground cumin
1/2 tsp. salt
3 Tbsp. vegetable oil. divided
5 corn tortillas
Corn salsa (recipe follows)
Garnishes: Sour cream, cilantro, avocado
In a food processor, combine black beans, breadcrumbs, chilies, green onion, chili powder, cumin, and salt. Process until mixture is smooth. Shape black bean mixture into 5 patties. In a large nonstick skillet, heat 1 Tbsp. oil over medium heat. Add black bean patties and cook, in batches if necessary, for 3 to 4 minutes, or until heated through. Set patties aside and keep warm. In the same skillet (or in another if you wish to do this at the same time as cooking the patties as I did) heat the remaining 2 Tbsp. of oil over medium-high heat. Cook tortillas, 1 at a time, for 1 minute per side or until lightly browned. Drain on paper towels. Place 1 black bean patty on each corn tortilla. Top each with desired amount of Corn Salsa. Garnish with desired toppings. Serve immediately.
Corn Salsa
1 can niblet corn, drained
1 can diced tomatoes and green chilies (I just chopped up 1 tomato and used that)
2 Tbsp. minced green onion
2 Tbsp. fresh lime juice
1 Tbsp. minced fresh cilantro
1/4 tsp. salt
In a medium bowl, combine corn, tomatoes, green onion, lime juice, cilantro, and salt. Cover and chill.
Spanish Rice
2 Tbsp. vegetable oil
1 Tbsp. ground cumin
1 onion, chopped
1 cup uncooked short grain rice
1 tsp. minced garlic
1 3/4 cups uncooked short-grain rice
1 tsp. chili powder
1 can tomato sauce
Preheat the oven to 350 degrees. Heat he oil in a large skillet over medium heat. Add the onion and garlic; cook and stir until the onions and translucent. Stir chili powder and cumin and cook for about 30 seconds. Add the rice, broth, and tomato sauce. Bring to a boil. Transfer to a 1 quart casserole dish and cover with foil or a lid. Bake for 35 to 40 minutes, or until the liquid has been absorbed and the rice is tender. Let rest for 3 to 5 minutes before serving.
Sunday, March 29, 2009
Potato-Corn Chowder
1/4 cup butter
1 yellow onion, chopped
1 red bell pepper, chopped
1 cup chopped celery
2 cloves of garlic, minced
3 pounds of red potatoes, but into 1/2 inch pieces
4 cups vegetable broth
1 1/2 cups frozen corn
1 pint heavy whipping cream
1 tsp. thyme
1 tsp. salt
1/2 tsp. ground pepper
5 ounces shredded Swiss cheese
In a large Dutch oven pot, melt butter over medium heat. Add onion, bell pepper, celery, and garlic. Cool for 6 to 8 minutes, or until the vegetables are tender. Add potatoes, broth, and corn. Bring to a boil over medium-high heat. Reduce heat, and simmer uncovered for 20 minutes. Add cream, thyme, salt, and pepper. Simmer uncovered for an additional 20 minutes. Add cheese, stirring until melted.
I served our soup with a loaf of freshly baked bread. The magazine has it served in bread bowls, which would be really nice, but I did not feel like buying any and the day just got too hectic to bake them. The soup did smell really nice while cooking though, and it was really tasty. The recipe states that it can be frozen for up to 1 month. We had about half of our soup left after we finished eating, and so I did freeze it. It should be a nice meal to have on a day when things just get too crazy to cook a good dinner.
Friday, March 27, 2009
Why Go Green?
Our Green Adventure didn't spark to life over night. Our current mindset was developed as a culmination of worry over what we were really feeding our children, and disgust at the consumerist mentality that has shaped our lives, among so many other sentiments. The road has been long and rough in some spots. We've definitely spent more money than was necessary in some instances, and we've saved a great deal in others.
We've been dismayed at the sight of a garden with watering problems and weeds that seemed to come back with two or three new sprouts for every one we pulled. Then we learned and adapted and came back the next year with a successful crop after rethinking how to manage the rows for water-flow optimization to reduce run-off and pooling and incorporating mulch to prevent the majority of the pesky weeds from sprouting up.
I personally spearheaded a slightly disastrous compost bin project. Tara wasn't too thrilled about it, but I dove right in. Of course, the results were not optimal, mostly since I placed it in a spot that gets more shade than sun. (The north side of a south-facing fence...) And while it isn't the most aesthetically pleasing thing in the world, it would have worked just fine had it been built in a sunnier location. Yet, I can't just move it since I built it out of cinder blocks, which I cemented together. Another compost fiasco was the black plastic bin we ordered from Costco. What a piece of junk! The plastic was brittle and flimsy and after shelling out 80 bucks, for something plastic, it became apparent that you don't always get what you pay for. It might be cheaply made, but that doesn't always mean it will be cheap for you.
So, yeah... the road has had some bumps and potholes along the way. But it has had some great success as well. Like the time we took the kids out to pick blackberries and then Tara made jam. Or joining the CSA and contributing to local farms while getting a share of the crops. Or snagging a few hours from my hectic work schedule last summer to head to the You-Pick-It farm for fresh off-the-vine produce. And I can't tell you how good it felt to pick tomatoes from our very own garden (one year after a completely failed attempt to grow something edible) and then to can up stewed tomatoes and spaghetti sauce from our very own fresh ingredients.
So, why go green? There are many reasons and the best ones are personal. Some people want to get away from corporate shortcuts and cost reducing methods of producing foodstuffs, a common example being Trans Fat and High Fructose Corn Syrup. Some people are disgusted with the way our nation's top producing companies handle meat production. Maybe you stop to wonder how many pesticides and other chemicals were used to produce that broccoli or lettuce in the produce aisle... For some it is a measure of prestige and being part of the 'In' thing. Whatever the reason, I commend you on your choice. It isn't always easy, but rethinking the way we do 'business-as-usual' is a personal reinvention that brings with it a treasure trove of long term benefits.
We hope to share with you some of our projects we've been working on, so stay tuned! Until then, here is a picture from one of our You-Pick-It farm excursions from last summer. I will always treasure this memory.
Sunday, March 22, 2009
Spring is here...sort of
1/4 c. sesame oil
2 1/2 Tbsp. apple cider vinegar
2 Tbsp. soy sauce
1 1/2 Tbsp. finely chopped garlic
1 tsp. ginger
1/2 tsp. crushed red pepper
1/2 lb. thin spaghetti
1 cup walnuts, coarsely chopped
1/2 onion, coarsely chopped
1 lb. asparagus, cut into 1-inch pieces
1/2 lb. snow peas
In a small bowl, whisk together 3 Tbsp of sesame oil, the vinegar, soy sauce, garlic, ginger, and crushed red pepper. In a pot of boiling, salted water, boil pasta until cooked through and then drain. Heat a large skillet over medium heat. Add the walnuts and toast for 2 to 3 minutes. Transfer walnuts to a bowl and wipe out the skillet. Heat the remaining 1 Tbsp. of oil over high heat. Add the onion and asparagus and cook for 2 to 3 minutes. Add the snow peas and the sesame oil mixture, then for for another 1 minute over high heat. Lower the temperature to medium, add the paste and cook until heated through. Top with the walnuts to serve.
All in all, I really liked this, although it was a bit bland for Brady. Our kiddos reactions were mixed with our son not wanting to eat much, and our oldest daughter quite liking it. The wee one picked at it pretty much like she does everything.
Sunday, March 15, 2009
Meatless Monday
We are currently saving a portion of our grocery budget towards the purchase of a quarter of a cow worth of meat during the next slaughtering season at a local ranch that has grass fed, free range cows. Having beef from a local source ensures that it is not factory farmed and will be markedly better for our health and the planet. But until then, we will enjoy at least one night a week without meat. To help us along with this, we need more meat free recipes. Each week I will be posting our recipe trials or things we already know we like. For more ideas and information on Meatless Monday, a quick Google search came up with this site: www.meatlessmonday.com.
Now on to the first recipe!
We tried the Potato and Kale Quiche from The Vegetarian Mother's Cookbook by Cathe Olsen. (This is a really nice book with lots of good recipes and wonderful food information. While it is focused on nutrition for pregnant and breastfeeding women, it is a great information resource for everyone.)
1 pre-baked pie crust
1 Tbsp. olive oil
1 onion, diced
2 cups peeled, diced potatoes (about 3 medium)
2 cups packed kale (the store did not have any, so I used spinach)
3 eggs
1 1/4 cups milk
1 tsp. dijon mustard
1/4 tsp sea salt
1/4 tsp black pepper
Pinch of ground nutmeg
1 cup shredded Monterey Jack or cheddar cheese (4 ounces)
Preheat oven to 375 degrees. Prepare filling while crust is pre-baking. Warm oil in skillet over medium heat. Add onion. Saute 5 minutes. Stir in potatoes. Cover and cook 5 minutes. Stir in kale (or spinach, in our case). Cover and cook another 5 minutes. Kale and potatoes should be tender but not overcooked.
Whisk eggs, milk, mustard, sea salt, pepper, and nutmeg until frothy. Place 1/2 of the cheese evenly over bottom of crust. Place potato and kale mixture over cheese. Cover with remaining cheese. Pour egg mixture over vegetables and cheese to fill crust. Bake for 40 minutes, or until center is set. Cool 10 minutes before cutting.
This was my first time making a quiche. It was also the first time I pre-baked a crust. I kind of messed up on that part. The filling was quite nice though and not too "eggy" like I worried about. I think we will try this again, maybe with some small modifications to better suite our family, and also using a larger pie pan.
For dessert we had Black and Blue Cobbler from Best of Country Slow Cooker Recipes. I could not find this book listed on either Amazon or Barnes and Noble, so I can not post a link at this time. The woman who contributed the recipe is Martha Creveling from Orlando, Florida. The cobbler was quite good, and smelled really nice while cooking. I can say that I did not include the orange peel, as we did not have any.
1 cup all-purpose flour
1 1/2 cups sugar, divided
1 tsp. baking powder
1/4 tsp. salt
1/4 tsp. ground cinnamon
1/4 tsp. ground nutmeg
2 eggs, beaten
2 Tbsp. milk
2 Tbsp. vegetable oil
2 cups fresh or frozen blueberries
2 cups fresh or frozen blackberries
3/4 cup water
1 tsp. grated orange peel
Whipped cream or ice cream, optional
In a bowl, combine flour, 3/4 cup sugar, baking powder, salt, cinnamon, and nutmeg. Combine eggs, milk, and oil; stir in dry ingredients just until moistened. Spread the batter evenly on the the bottom of a greased 5 quart slow cooker. In a sauce pan, combine berries, water, orange peel, and remaining sugar, bring to a boil. Remove from the heat; immediately pour over batter. Cover and cook on high for 2 to 2 1/2 hours or until a toothpick inserted into the batter comes our clean. Turn cooker off. Uncover and let stand for 30 minutes before serving. Serve with whipped cream or ice cream if desired.
Thursday, March 5, 2009
Small Steps
This seems to be one of the irks about trying to live more environmentally friendly. While you are trying hard to strive for something, there are others that do not seem to care. Like the dad who does not turn off his truck while waiting to pick up his kids from school, even though it is a beautiful day out and there is no reason to idle the car for 30 minutes. It makes me upset, but what can I do about it without sounding "preachy." Sounding high and mighty about something never really wins people over. I know if someone who was more environmentally friendly than me gave me a lecture while I was minding my own business, it would not encourage me to see the wrong of my ways. The way I look at it is that being better for the earth is change to be made in small steps. Our family will continue striving to be kinder to the earth because it makes us feel better to do so, and we will hope that maybe our example will help others on their way.
Wednesday, March 4, 2009
High Fructose Corn Syrup on My Waffles?! No Way!
Now, we've all seen the commercials telling us, with very bad logic, how High Fructose Corn Syrup is fine in moderation. But one of our goals in the move towards a greener, more natural, and sustainable lifestyle is 'eating closer to the vine' - chemically altered foodstuffs are not an attractive solution for this family's dining dilemma.
If you haven't seen the High Fructose Corn Syrup commercials, please, allow me to enlighten you.
While you're at it, check out some of these funny responses!
The truth is, we're starting to cut back on a lot of things that contain High Fructose Corn Syrup. I drink a lot less soda now, replacing the cold beverage with herbal teas that include little to no sweetener. This summer we'll be making a great deal of sun tea and may even spring for a batch or two of homemade root beer. When it seems that the habit of drinking a soda is too strong, there are always real sugar alternatives like Jones Soda. They may cost a little more than the "traditional" options, but what else can you expect with the cost cutting measures of using a chemically altered sweetener? Hands down, sugar is more expensive.
So, what did we decide to do about the blueberry topping? We picked up a package of frozen blueberries and looked up a recipe for blueberry pie filling. Looks like breakfast won't be ruined after all!