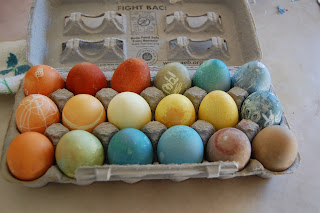
I had said many weeks ago that I would talk about our Easter egg dyeing this year. It is obviously no longer even close to Easter, but hey, that makes it closer to next year, right? This year I decided that we would be dyeing our eggs with natural dyes from food. I mainly wanted to do it for fun, but also because I have been noticing more and more how much artificial dye is in everything. There have been some studies that have shown that some children are sensitive to red food dye, causing them to be overly active and out of control. The risk of that is pretty low, but why chance bad effects of artificial dyes when you can have a lot of fun with natural ones? My mom and younger sister even came over to dye eggs with us.
To be perfectly honest, this is a quite a bit more work than plopping those little color tablets into a small cup of water with some vinegar. It probably is a bit more expensive too, considering the price I saw on some Easter egg coloring kits this year. For me it was worth it though, and I do believe we will be repeating the venture next year, hopefully with improvement.
So, how do you go about making natural dyes for eggs. Here are all of the colors that we made, the ingredient used, and how I made the dye. I also wrote how each one worked out. Of note, I did add a couple tablespoons of white vinegar to each color.

Yellow - Turmeric. I boiled about a tablespoon in a quart or so of water for about 15 minutes. It worked very nice and made beautiful bright yellow eggs. This was the dye that worked the fastest.
Orange - Yellow Onion Skins. I filled a large pot with onion skins that I had been saving in a mesh bag for a couple of months. Then, I covered them with water and boiled until the water became a nice deep orange color. It made a lot more dye than I needed, but the eggs were really nice.
Blue - Red Cabbage. Again, this is a boiling one. The blue color of the water after boiling a while is absolutely beautiful and turns the eggs a lovely blue. The eggs do have to sit in the dye for a while, at least 30 minutes or so for it to color them. I am thinking next year I will boil the eggs to cook them in the dye to help them take the color faster.
Purple - Grape Juice. I used concentrated grape juice, diluted enough to fill a quart jar. This one did not really work out too well. The eggs were kind of sticky and if you tried to rinse the stickiness off, the dye would come off a bit. I found that if I let them dry completely and then rinsed them it worked better. It also looked like blue more than purple, so I do think I will be trying to figure out a better way to make purple though.
Pink - Beets. I used canned beets for this. I just drained out the liquid and used that to dye the eggs. It did not work well. It will probably work better if I get fresh beets and boil them. This method made beige, only slightly pink eggs which were not very exciting.
Green - Spinach, and then a combination of red cabbage and turmeric. I had read somewhere that spinach could be used to make green dye. Boiling spinach to make green dye did not work. It smelled bad and was a gross brownish-greenish color that was not really dark enough to dye anything. Luckily, taking an egg that had been dyed blue with the red cabbage and then putting it in the turmeric dye for a bit worked very nice so we were able to have some green eggs.


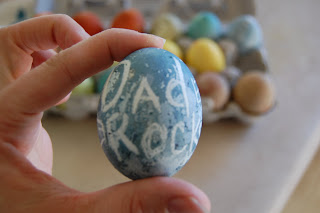
 We had a lot of fun dyeing our eggs. The kids used a white crayon to draw their names and things on some of the eggs before dying them. Brady wrote "Dad Rocks" on one and whoever found it got a dollar. My younger sister wrote that she was the bomb on another. The only downside I saw to dyeing eggs this way was the initial prep time, which was not that bad, and that you need a little more patience to see the eggs colored since the dye takes longer.
No comments:
Post a Comment