Sunday, May 17, 2009

Growing Hazelnuts


About three years ago I saw an ad from the Arbor Day Foundation that had hazelnut bushes for sale. As one often prone to making impetuous decisions, I fervently insisted that we get some! I logged countless hours of research on the internet, devouring anything I could find on the topic of growing hazelnuts. I encountered information ranging from growing hazels from seeds and clippings to emerging markets in hazelnut production.

My dreams of someday selling candied hazelnuts at the farmer's market were dashed, however, when all three of my plants died. The next year I received a survey from the Arbor Day Foundation asking me how my plants were fairing. I indicated that they were dead and they offered to send replacement plants during the next planting season. Of those three replacement plants, only one remains. I planted two in my yard and entrusted the third to my mother.

Without significant growth, I did not have high hopes for my two. Imagine my surprise when I parted the spring wall of grass to discover this one survivor, after losing all hope that I would one day have healthy hazelnut bushes in my backyard. When we visited my mom for Mother's Day, I slipped back to check on the one I had hoped would have better luck in her yard. I was saddened when I could not find it in the monstrous pack of weeds that had overtaken the area where we had planted it.

My hope now is that I can help this last little guy along until he is healthy and hardy enough to offer a clipping so I can plant another bush. I'll keep you posted!

Saturday, May 16, 2009

Planting a Garden

+
Each year we have strived to make better use of our bountiful garden area. Last year marked the best efforts, with about two thirds of the space planted and maintained throughout the growing season. We've learned some tough lessons along the way that have helped us better understand weed control and how to better control watering with a heavy, clay based, soil. What we were unable to plan in time, we covered with a tarp, black side up, in order to nuke any weed seeds that might be waiting underneath with the heat of the hot summer sun.

This year, however, we have finally hit the mark and all of our garden has been planted, or has seedlings waiting to be hardened before moving to their allocated positions. Not only that, but we have moved outside of our large garden area and have put a few raised beds together. These beds are the new homes of salad greens and radishes, potatoes, and raspberries. I've also got an order of sweet potato starts on the way!

I am in the process of standing up a bean trellis along a portion of our white vinyl fence to contrast with a plentiful wall of green foliage and succulent beans for use in stews, soups, salads, and all other sorts of delectable dishes. Garden fresh green bean casserole, anyone? We are growing five types of beans this year: the standard green bean, a purple bean (which will turn green when cooked), a yellow bean, an Italian flat bean, and the prize of the lot, Dragon Tongue (link to Burpee, the producer of our original seeds)- an heirloom bean we hope to propagate through the years to come.

The project has gone so well that we will likely duplicate the effort along another section of fence for a cucumber jungle gym of sorts. Anyone who has ever grown cucumbers before can attest to their natural ability to climb and elbow their way through a garden. Giving them their own space to climb seems like a sensible notion. Besides, we can always rotate them with the beans in the years to come.

With most of the mulch down and the the majority of our seeds in the ground, I can rest my hands on my hips, take a deep breath, and allow my chest to swell with a bit of pride. We've learned so much in these past years and we've worked so hard this season. Sure, it isn't over yet and there are still obstacles to overcome, but we can be proud of everything we've managed to accomplish as a family.

If you would like to read an article I recently published about starting a garden, click here. Also, we'd be honored if you would bookmark this blog and return to join us on our green adventure. I am currently putting together a video detailing some of our specific gardening efforts and a few of the lessons we have learned. There are several more posts a-brewin', including a glimpse into my recent homebrewing efforts - so stay tuned!

Bookmark Our Green Adventure - A Family Blog

Thursday, May 14, 2009

Easter Egg Dyeing, Green Style


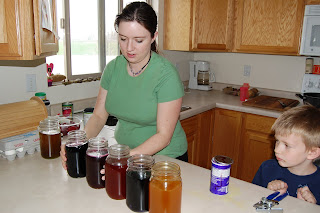
I had said many weeks ago that I would talk about our Easter egg dyeing this year. It is obviously no longer even close to Easter, but hey, that makes it closer to next year, right? This year I decided that we would be dyeing our eggs with natural dyes from food. I mainly wanted to do it for fun, but also because I have been noticing more and more how much artificial dye is in everything. There have been some studies that have shown that some children are sensitive to red food dye, causing them to be overly active and out of control. The risk of that is pretty low, but why chance bad effects of artificial dyes when you can have a lot of fun with natural ones? My mom and younger sister even came over to dye eggs with us.

To be perfectly honest, this is a quite a bit more work than plopping those little color tablets into a small cup of water with some vinegar. It probably is a bit more expensive too, considering the price I saw on some Easter egg coloring kits this year. For me it was worth it though, and I do believe we will be repeating the venture next year, hopefully with improvement.

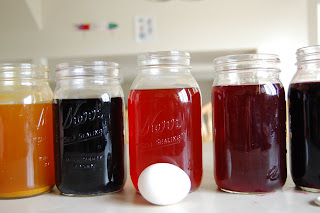
So, how do you go about making natural dyes for eggs. Here are all of the colors that we made, the ingredient used, and how I made the dye. I also wrote how each one worked out. Of note, I did add a couple tablespoons of white vinegar to each color.


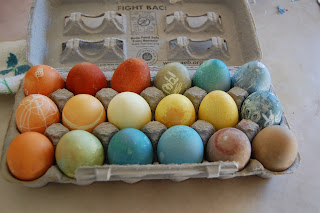
Yellow - Turmeric. I boiled about a tablespoon in a quart or so of water for about 15 minutes. It worked very nice and made beautiful bright yellow eggs. This was the dye that worked the fastest.

Orange - Yellow Onion Skins. I filled a large pot with onion skins that I had been saving in a mesh bag for a couple of months. Then, I covered them with water and boiled until the water became a nice deep orange color. It made a lot more dye than I needed, but the eggs were really nice.

Blue - Red Cabbage. Again, this is a boiling one. The blue color of the water after boiling a while is absolutely beautiful and turns the eggs a lovely blue. The eggs do have to sit in the dye for a while, at least 30 minutes or so for it to color them. I am thinking next year I will boil the eggs to cook them in the dye to help them take the color faster.

Purple - Grape Juice. I used concentrated grape juice, diluted enough to fill a quart jar. This one did not really work out too well. The eggs were kind of sticky and if you tried to rinse the stickiness off, the dye would come off a bit. I found that if I let them dry completely and then rinsed them it worked better. It also looked like blue more than purple, so I do think I will be trying to figure out a better way to make purple though.

Pink - Beets. I used canned beets for this. I just drained out the liquid and used that to dye the eggs. It did not work well. It will probably work better if I get fresh beets and boil them. This method made beige, only slightly pink eggs which were not very exciting.

Green - Spinach, and then a combination of red cabbage and turmeric. I had read somewhere that spinach could be used to make green dye. Boiling spinach to make green dye did not work. It smelled bad and was a gross brownish-greenish color that was not really dark enough to dye anything. Luckily, taking an egg that had been dyed blue with the red cabbage and then putting it in the turmeric dye for a bit worked very nice so we were able to have some green eggs.


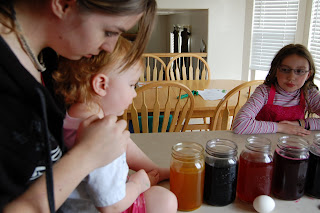
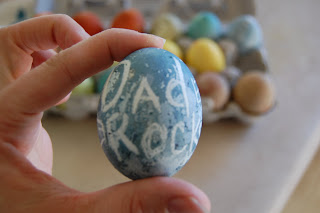
We had a lot of fun dyeing our eggs. The kids used a white crayon to draw their names and things on some of the eggs before dying them. Brady wrote "Dad Rocks" on one and whoever found it got a dollar. My younger sister wrote that she was the bomb on another. The only downside I saw to dyeing eggs this way was the initial prep time, which was not that bad, and that you need a little more patience to see the eggs colored since the dye takes longer.

Tuesday, May 12, 2009

Asparagus Leek Soup

So, I am a day late posting this. Our recent vacation has gotten me a bit off my schedule, but it was worth it. For this week, the recipe we tried was Asparagus Leek Soup. I got a recipe off the Taste of Home website and changed it a bit. We thought it was alright, but no one was clamoring for seconds.

1 large leek, sliced into 1/2 inch pieces
3 Tbsp. butter
4 medium potatoes, peeled and diced
3 medium carrots, thinly sliced
1 tsp. salt
2 1/2 quarts vegetable broth
1/2 cup uncooked long grain rice
1 pound fresh asparagus, cut into 1-inch pieces
1/4 tsp. pepper
1 cup heavy cream

In a saucepan, saute the leek and onion in b utter until tender. Add the potatoes, carrots, salt, broth, and rice. Cover and bring to a boil. Reduce heat and simmer for 25 minutes. Stir in the asparagus, cover, and simmer for an additional 10 minutes or until vegetables are tender. Add the pepper and cream; heat through.

I cannot say why this was not really our thing. We did like the Potato Corn Chowder we had a while back. Maybe we are cream souped out? I think a variation of this done with more of a tomato broth would be better for us. Perhaps in the future you will see it here.

Saturday, May 9, 2009

Live Green Eco-Festival

We attended the Live Green Eco-Festival in Salt Lake City, Utah this afternoon on a whim of sorts. We just got back from a family vacation and we're all still a bit tired, but the drive down to Salt Lake was well worth it!


There were several vendors selling ready-to-plant vegetables. The widest variety came in the form of heirloom tomatoes. Since Tara and I are both very interested in propagating seeds from our garden to plant the next year's crops as much as possible, we were very interested in the unique heirloom varieties. Here are a few that we decided to bring home with us (click on the pictures for a larger view):


There were several other attractions to the Live Green Eco-Festival as well. We didn't have time to watch any of the movies or presentations, but we perused the booths and grabbed a bite to eat from the zero-waste food vendors.


Tara also found some very nice soap and couldn't help but bring a few bars home with us. (I guess there are worse things to be addicted to!)

One of the more prominent highlights of the festival, though, was the kombucha Tara found! This was quite a surprise as we've been wanting to start brewing our own kombucha tea but had no idea where to find a live culture.


(Special thanks goes out to Catalyst Magazine!)

Sunday, May 3, 2009

Playing for Change

What is it about people who tote the green agenda and their seemingly universal views of peace? I don't know. Maybe when you start to become more conscious about your own actions and how they impact the world around you, you become faced with the monstrosities that impact the rest of the world. It can be overwhelming at times, carrying the weight of not feeling like you can make a difference. Sure, some wars should be fought, but if you step into the fray for one situation, aren't you obligated to get involved to right every injustice? What about Darfur and the genocide that the world has mostly turned a blind eye to? Does it all come down to the lyrics of a song, War - What is it good for? In the end, we can hope for peaceful resolutions, but we all know that the world is far more complicated than that.

On a lighter note, I am proud to present a video that I stumbled across on YouTube. It is an immaculate representation of human ingenuity that so many people could come together from so many parts of the world to create something as beautiful as this: